|
|
Post by huntsgemein on Aug 3, 2017 22:20:36 GMT -5
$125 per square meter! Shit Holmz, hope you don't need a lot of it!
What about some recycled pavers as an economical alternative? Do you have a local tip-shop? Some people might turn up their noses, but I've furnished much of my household (especially with appliances) from my local tip.
|
|
|
|
Post by holmz on Aug 4, 2017 3:09:49 GMT -5
I thought it was only $100/meterˆ3, but still it's a lot.
My only consolation is that a divorce lawyer charges more.
I found a big 4x4, and maybe if I get some other product in Perth I can haul it back in the bed of it...
Looking to justify a new (slightly) ute.
|
|
|
|
Post by rizzoa13 on Aug 4, 2017 19:11:11 GMT -5
That stuff looks like it can be screwed (or installed with hidden fasteners over some wooden framing). Could probably set it in some mud like tile also if you had a concrete slab poured.
You'll probably throw up at the price of grading, tamping, base and a concrete pour though just to put that overtop of.
A ground deck has its own concerns, namely air flow.
I'd go with an elevated deck OR pavers set in an appropriate sand base and sand locked together. If they move and you get a lip you just remove it, fix the base and reset it. If your concrete slab that you mudded those boards onto moves and cracks you might be fine or you might get a high/low spot that's many times harder to remedy.
|
|
|
|
Post by holmz on Aug 4, 2017 20:20:31 GMT -5
... 1) You'll probably throw up at the price of grading, tamping, base and a concrete pour though just to put that overtop of. 2) A ground deck has its own concerns, namely air flow. ... I agree with the whole thing Anthony. And for these two...: 1) I have some labourer help, so the shovel work would be intermixed with laser level measurements. You idea about the pavers over a thin sandy base I have been considering. (which saves on ~50 Mˆ2 of concrete) Do people use a layer of plastic somewhere in that mix for both water erosion? as well as to mitigate weeds/plant from rooting in? 2) In addition to airflow, it could be a haven for spiders and mosquitos. |
|
|
|
Post by rizzoa13 on Aug 5, 2017 15:58:09 GMT -5
The prep work for pavers is pretty intensive but worth it. Pretty sure there's about a foot of various base materials (trap rock, crushed concrete and then sand). Landscape felt is put down under the sand so weeds can't grow up through and a special sand is used to lock them all in place.
Your grade needs to be set before all of that to divert the water wherever you want it to go. You'll probably need a machine for the grading and diet removal, along with bringing in all the base materials.
Have fun with that one 🤣.
|
|
|
|
Post by calidecks on Aug 5, 2017 23:31:23 GMT -5
The other project that there is a drainage issue when it rains, and where the water has cascaded off the roof has resulted in erosion which has further exacerbated the problem. I used a laser level and created a topi map in the back and around the side. The next step if to contour the ground to restore a slope away from the foundation/Slab. Then pack it down. Then either concrete, pavers, or something else....? My master-planner sent me this: www.bunnings.com.au/james-hardie-hardiedeck-board-3000-x-196-x-19mm-decking_p0710711And fancies it as a surface... I am thinking perhaps over some concrete...? The plan will be to have it sloped slightly and then potentially a spoon drain in the middle of a ~12'(4M) wide area to jettison the water out towards the front yard. This is hair-brained scheme is something that I would appreciate some knowledgeable advise on... Perhaps calidecks ? as the other idea was the concrete, or some footings and a low deck... But I still need to address moving water, which mean recontouring the dirt with a slight slope. And like effluent, it flows downhill. Any input is appreciated. It's been my experience to pour a sleeper slab for any composite/PVC deck on grade. With drains under the deck. Slope the slab and build the deck level. Similar to this.   |
|
|
|
Post by calidecks on Aug 5, 2017 23:45:36 GMT -5
Here's another over a slab   |
|
|
|
Post by toomanytoys on Aug 7, 2017 8:01:13 GMT -5
Not sure this will help or not. I posted some of this before, but it might give some ideas here. Non-pro, but grew up within a landscaping business and still a farmer. We decided to update the back of the house with a low deck and bluestone combination. We have a thin layer of topsoil over very dense clay, clay that has the consistency of pottery clay, and the backyard mostly slopes to the house. When we first bought it I regraded to have at least a swale where 2" of water wouldn't be sitting at the back foundation. Another thing I did early was put in drain lines for the downspouts that went further downhill to the street at the front of the house. The deck this time was going to be low as we are getting older, and as you guys are talking about, a real issue for excessive dampness user the deck destroying the framing and deck itself. All fasteners and brackets are stainless. For the deck I left some spacing for air, but I placed crushed stone under it so I could grade it away. On top of the stone and piers I placed two layers of 10mil plastic sheeting. After doing so I used our sprinkler to simulate rain to find any puddling, then adjusted the stone to eliminate it. Once the grading was satisfactory I continued the carpentry.    Not shown in the front of the deck is a drain line embedded 12" down in the soil, wrapped with weed blocker and attached to the 4" drain lines heading to the front low of the property. After the Ipe deck was completed, I started to work on the stonework. I've done sand under pavers and over decades not happy with it long term. So this time I was going to use 3/4" base stone with pulverized stone over it. I was overly optimistic about the rain issue. And a typical August rain delay brought back old memories. Actually, having a worse case storm was probably the best thing to happen then.  Clay soil and heavy rain don't mix well in the hood.  So with my compact backhoe from the farm I dug up all the 8" I put down and restarted. I don't have saved images of it but I put in a network of 1-1/2" pcv piping drilled for drainage and again wrapped with root stopping mesh. The lines were spaced 3' on center, sloped to the side of the house and tied into the downspout drain lines located on that side. One line also was placed just outside of the planned edge of the deck. Large stone replaced and pulverized bedding stone on top. It was reworked now with 8"+ 4" before the bluestone added. It ain't going anywhere. We're at about 8 years out now and not had any issues. It takes a full east coast monsoon before any water collects. An image right after the work but before grass could fill in back to the stone line. Ipe surrounds the stonework.  Peaking under the deck, there is no deterioration of the treated framing and the Ipe has been free of any twists. |
|
|
|
Post by holmz on Oct 7, 2017 1:46:50 GMT -5
I need some help... It all went pear shaped with the rain, and it looks like the 2x4s underneath swelled and the concrete board did not expand with water, nor did the Jarrah. (So the 2x4s are now proud of the edge.) I am thinking of slicing the 2x4s to become separate pieces 8" to ~1 foot long on the backside, in order to allow them to swell but stay in the same place? What would smart people do?  The whole thing 3 weeks ago. 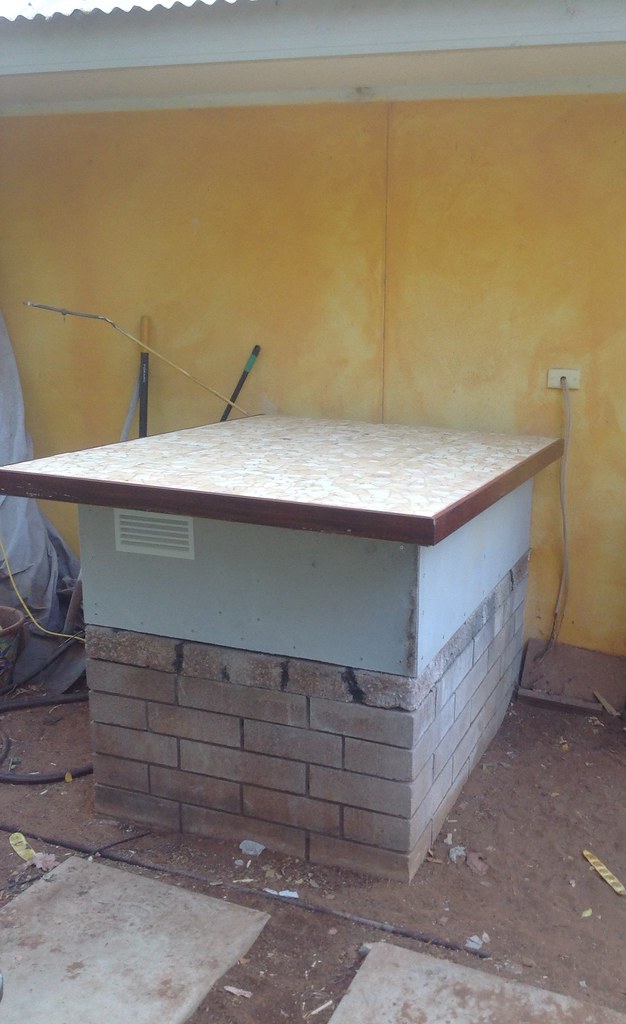 |
|
|
|
Post by erik on Oct 7, 2017 9:34:12 GMT -5
Hey Holmz, do you want to keep the wood or add a masonry/tile edge instead. Maybe a thick pvc wrap?
|
|
|
|
Post by huntsgemein on Oct 7, 2017 16:00:54 GMT -5
Maybe just ditch the timber border altogether? Being outdoors & natural timber, it will otherwise always be subject to the vagaries of the Alice's weather extremes
|
|
|
|
Post by kraftt on Oct 7, 2017 19:45:01 GMT -5
You say the concrete board did not expand, is this the backer board to the tiled top?
(btw - not from around those parts, what is the function of the structure?)
Is there and way, after removing trim/boarder, to undercut / trim back the swelling 2x4's so that they can't expand beyond the tile edge? Then attach a new boarder/skirt to only the underside of the tile backer board (that is stable) with brackets (perhaps fastened with polyurethane construction adhesive) to support only the boarder/frame? Depending on thickness tile base 'float' or lack thereof is it possible to drill in anywhere horizontally into stable tile base/backer board and epoxy in pins (no expanding type of anchor) to support frame?
If you do something like this where the boarder is only mated to the top for support I would remove the grout around the edges and color some Sika flex and pour that in to bridge the gap. Of just some grey Sika and then dust with colored sand to match grout.
|
|
|
|
Post by holmz on Oct 7, 2017 22:42:31 GMT -5
You say the concrete board did not expand, is this the backer board to the tiled top? (btw - not from around those parts, what is the function of the structure?) Is there and way, after removing trim/boarder, to undercut / trim back the swelling 2x4's so that they can't expand beyond the tile edge? Then attach a new boarder/skirt to only the underside of the tile backer board (that is stable) with brackets (perhaps fastened with polyurethane construction adhesive) to support only the boarder/frame? Depending on thickness tile base 'float' or lack thereof is it possible to drill in anywhere horizontally into stable tile base/backer board and epoxy in pins (no expanding type of anchor) to support frame? If you do something like this where the boarder is only mated to the top for support I would remove the grout around the edges and color some Sika flex and pour that in to bridge the gap. Of just some grey Sika and then dust with colored sand to match grout. The mongrel is what an evaporative cooler sat on which had water running down loose hemp-type matting and big fan to push the evaporatively cooled air in a vent under the house. The Boss claimed then when it rained that she could smell mould and believed that the air in the duct was stale. So I got an RV fan and 230->12V power supply and have the fan inside running at 10% to pull a gentle steady flow out of the vent space. She wanted to retain the pedestal as feature... The backer is a 18-mm concrete board. The 2x4s were to stiffen the top and provide a place for biscuits for the Jarrah edge. However the edge looked like an archeological dig with the layers of concrete board and grout/mortar, so it needed some covering.. Hey Holmz, do you want to keep the wood or add a masonry/tile edge instead. Maybe a thick pvc wrap? She was not interested in tiling the edge - I will investigate a PVC wrap, but regular PVC spinkler pipes turn black in th sun. The good news is that the mould smell is gone. I could not smell it and she is happy on that front. --- I am leaning towards making slicing cuts in the 2x4s so that they become sections that allow them to expand and contract to and fro (lengthwise) and basically the biscuit locations do not move. The whole 2x4 seems to have grown ~1/8" to 3/16th" from the rain. The 2x4s were screwed to the top with countersunk zinc screws, hence the heads are underneath the tiles... Maybe just ditch the timber border altogether? Being outdoors & natural timber, it will otherwise always be subject to the vagaries of the Alice's weather extremes I have use Jarrah for other things, so I think it is the 2x4s which are the bigger issue. And it looked pretty daggy with the edge exposed. Tiling would probably be the best...But I may try to sort out the Jarrah in a rescue attempt - as per the 2x4 slicings |
|
|
|
Post by huntsgemein on Oct 7, 2017 23:53:26 GMT -5
Might be an ideal site for some of that humidity resistant plastic wood decking you mentioned earlier. No swelling, only limited thermal expansion & contraction rather than seasonal moisture driven instability.
|
|
|
|
Post by holmz on Oct 8, 2017 2:47:51 GMT -5
I like it - but the 2x4s in the back need to be addressed. I probably should have used the plastic gear there  |
|


