|
|
Post by Red on Nov 1, 2015 2:35:53 GMT -5
We use the Grey Stone (SG-250) and the Black Stone (SB-250), Mister Holmz. I'd love  to own the turquoise 4000-grit Japanese Stone (SJ-250), but higher priorities seem to bump luxuries like that aside. to own the turquoise 4000-grit Japanese Stone (SJ-250), but higher priorities seem to bump luxuries like that aside.
Which Tormek system do you own? Do you own the Truing-Tool (TT-50)? If so, is the cutter on your TT-50 in good condition?
Assuming that you have the essential grading stone (SP-650), you must first true the cutting stone to be parallel with your square-edge jig (SE-76) and then grade the top of the main cutting stone with the grading stone -- rough side first to form a properly consistent edge angle on your tool (without any nicks) and then the smooth side to sharpen said edge angle. In short, the grading stone "changes" the surface of your cutting stone from coarse to fine and vice versa.
In closing, the truing tool and the grading stone are basic necessities when operating a Tormek system. Let me know what you have on hand and whether or not you need any help getting the things you [might] need.
|
|
|
|
Post by holmz on Nov 1, 2015 3:17:15 GMT -5
We use the Grey Stone (SG-250) and the Black Stone (SB-250), Mister Holmz. I'd love to own the turquoise 4000-grit Japanese Stone (SJ-250), but higher priorities seem to bump luxuries like that aside.
Which Tormek system do you own? Do you own the Truing-Tool (TT-50)? If so, is the cutter on your TT-50 in good condition?
Assuming that you have the essential grading stone (SP-650), you must first true the cutting stone to be parallel with your square-edge jig (SE-76) and then grade the top of the main cutting stone with the grading stone -- rough side first to form a properly consistent edge angle on your tool (without any nicks) and then the smooth side to sharpen said edge angle. In short, the grading stone "changes" the surface of your cutting stone from coarse to fine and vice versa.
In closing, the truing tool and the grading stone are basic necessities when operating a Tormek system. Let me know what you have on hand and whether or not you need any help getting the things you [might] need. Thanks Red - Amazon does pretty good... Those 'barstards' I got the T7 from though swore it was 220v... I will need to bring the box out of the garage where it got reshelved. There is a diamond knobed job that it came with, which I am sure is the TT-50 as it looks like a picture on the net.. I assume it is in good condition, and I have not used it  (I suppose if I was wise I would now use it... I just thought, well that wheel is new.) I should also check that the F-bar is colinear with the axis of rotation - that was what I assumed was the issue. I hit the wheel a few times with the SP-650, going course and fine. I used the SE-76 for the chisels and planer blades. I also have some double ups... It came with the knife sharpener, but I had ordered one, so now I have 2. And an extra SE-76, and I think one or two more. The long knife sharpener seemed to foul the tool when working the tip. Mainly as the tip moves further away the angle is reduced, so the tool fouls the wheel. Not a huge deal and I use the end of the blade nearest me, but the Haus-Frau wields a knife like it is a foil... (Point first). If you, or anyone needs some of the extras... just asketh. |
|
mattuk
Junior Member

Posts: 79 
|
Post by mattuk on Nov 1, 2015 4:18:55 GMT -5
Hi Red, Thanks for the reply. I was reading through the posts from gents such as yourself, Garch, holmz and others that led me to ask the question here. I was on a building site fetching and carrying for my Dads building business from about 5 years of age, before a heart attack led to a change in direction for him. He then ran a kitchen showroom that I am now sat in typing this message. He has long since retired. I have been here two decades. The timber is being installed within a kitchen showroom, which remains open and trading during the week. I removed the existing suspended ceiling because I wanted to take advantage of the height ( just over 14' ) at the apex of the new ceiling. I know my customers would appreciate the beamed effect. Some of them live in beautiful old ( listed ) buildings and having the set in here enables them to see how the kitchen would sit in their space. The remaining 1500 sq foot retains the suspended ceiling. The floor is power floated concrete, approx 35 years old, and a real P.I.T.A to cut a trench through for power to the central island. The uprights shall bear upon 6mm steel pads with a pin to locate to the bottom of the beam. Whilst metal jointing elements may be easier I wanted to stay with the look of traditional M&T joinery, drawbore pegged. The pegs arrived from the supplier as 20mm turned dowel ( not what I was expecting ). I have a draw knife here and expect to make proper tapered pegs as soon as I get a chance. The mortice is not concerning me a great deal. I already had the KSS80 and the quality led me to look for preloved tools. I was fortunate to find a couple of great bits ( old LS103 etc ) on the well known auction site by hunting within Germany. The cad work was to get an understanding of how the frame would fit within the space, ensuring I have enough unobstructed runs for appliances etc. There shall be a skin over the top of the trusses which I expected to form in 18mm ply, with further ribbing on the top side for added rigidity before adding the plasterboard to the underside. I have taken a photo of the space this morning and look forward to any advice / suggestions both on the Barr chisel supplier ( the site I listed was my best price so far ) and the structure itself which is open to changes / improvements. I am happy to spend effort maintaining edges etc. I have the Tormek system at home which was used primarily for wood turning gouges ( been a long while since I have stood in front of the lathe ). I look forward to any input. My thanks in advance. Matt ![]() Attachments:

|
|
|
|
Post by holmz on Nov 1, 2015 7:12:50 GMT -5
You look like you have the hard/$$ gear.
Just get a good chisel and mallet and get stuck into it. BQ, Neeman, or any other... they all do the same deal.
Maybe some test joints if you need t, or just make the joints on longer beams and then trim the base - which gives you some wiggle room in case the cut needs a retrim?
|
|
|
|
Post by Red on Nov 1, 2015 12:38:39 GMT -5
I'm on my way to check on a job in progress, Mattuck, but I have to ask a couple quick questions:
Are those your "preloved" tools?
Are those the timbers you'll be cutting joinery into?
If the answer to both of those questions is "YES," you're well on your way, mate...and, I'll admit it, you've even got a couple of tools there that have me salivating...I mean, that Protool/HEMA beam saw in your photo looks (a lot) like a tool that's on my bucket list. 
|
|
mattuk
Junior Member
Posts: 79
|
Post by mattuk on Nov 1, 2015 17:18:39 GMT -5
I'm on my way to check on a job in progress, Mattuck, but I have to ask a couple quick questions:
Are those your "preloved" tools?
Are those the timbers you'll be cutting joinery into?
If the answer to both of those questions is "YES," you're well on your way, mate...and, I'll admit it, you've even got a couple of tools there that have me salivating...I mean, that Protool/HEMA beam saw in your photo looks (a lot) like a tool that's on my bucket list. Hi Red, Yes, that is both the oak I shall be fighting and the tools I hope to fight it with. I have been lucky with the bidding site. The last thing to purchase for this project was the slick / framing chisel and mallet. I have no experience with those hence the inspiration from you gents on here, and the questions that followed. I know the project shall be more than a little of a head scratcher. I need to form it 5" off the floor on blocks ( above the existing ceiling ) and then lower the whole project cutting the existing ceiling to leave a 1/2" shadow gap. I look forward to hearing from you when you get back from site. My best regards. Matt |
|
|
|
Post by Red on Nov 2, 2015 0:03:31 GMT -5
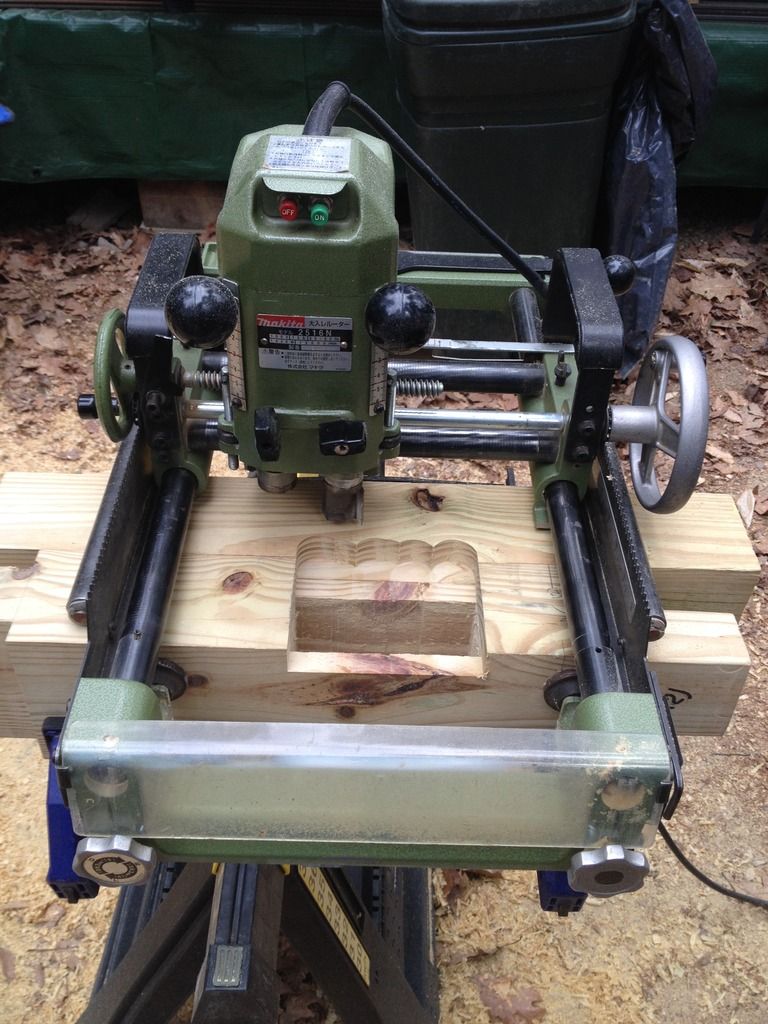
I was inspired by Joe's Colorado heavy timber project, so I thought I'd do something I haven't done in a while; namely, post a photo of another fine proven timber framing tool. This time around, it's Makita's workhorse timber housing router, 2516N. Just like the 7305H depicted earlier in this thread, it employs a clamping chassis that grips both medium and large timbers alike. The difference, however, is in the cutting element -- the 2516N can drive two separate carbide router bits at once.
The stout clamping chassis allows the cutters to be adjusted, via hand-turned wheels, along the x- and y-axes, while the large handles on either side of the machine allow the user to plunge the router bits independently.
|
|
|
|
Post by lincoln on Nov 2, 2015 0:15:34 GMT -5
That is one impressive tool.
What dia. are the cutter shanks? And, is the second/back piece of timber to prevent tearout?
|
|
mattuk
Junior Member
Posts: 79
|
Post by mattuk on Nov 2, 2015 0:50:04 GMT -5
Red, where did you find these tools?
Did you import them or have to hunt in Japan ?
|
|
|
|
Post by Red on Nov 2, 2015 1:16:20 GMT -5
....I removed the existing suspended ceiling because I wanted to take advantage of the height ( just over 14' ) at the apex of the new ceiling. I know my customers would appreciate the beamed effect. Some of them live in beautiful old ( listed ) buildings and having the set in here enables them to see how the kitchen would sit in their space. The remaining 1500 sq foot retains the suspended ceiling.... ....Whilst metal jointing elements may be easier I wanted to stay with the look of traditional M&T joinery, drawbore pegged. The pegs arrived from the supplier as 20mm turned dowel ( not what I was expecting ). I have a draw knife here and expect to make proper tapered pegs as soon as I get a chance. The mortice is not concerning me a great deal. I already had the KSS80 and the quality led me to look for preloved tools. I was fortunate to find a couple of great bits ( old LS103 etc ) on the well known auction site by hunting within Germany. The cad work was to get an understanding of how the frame would fit within the space, ensuring I have enough unobstructed runs for appliances etc. There shall be a skin over the top of the trusses which I expected to form in 18mm ply, with further ribbing on the top side for added rigidity before adding the plasterboard to the underside. I have taken a photo of the space this morning and look forward to any advice / suggestions both on the Barr chisel supplier ( the site I listed was my best price so far ) and the structure itself which is open to changes / improvements. I am happy to spend effort maintaining edges etc. I have the Tormek system at home which was used primarily for wood turning gouges ( been a long while since I have stood in front of the lathe ).
I'm happy to read that you've chosen to go the traditional TF route by draw-boring your joints with wooden pegs. You mentioned your concern about peg material and using a drawknife, so I wanted to ask you if you've ever used a shaving horse. If not, it's a fairly simple way to turn dimensional hardwood blanks -- in the species of your choosing -- into [tapered] pegs for draw-boring.
Given the Mafell tools you've included in your photos, Mattuk, mortising will simply be a matter of proper layout followed by careful placement and adjustment of your tools. Given the fact that you've chosen a hardwood for your endoskeleton framing project, you need not be concerned about any oversized M&T joinery. If there's room in your tool budget for it, I'd recommend getting both 2-inch and 1.5-inch BQ framing chisels (FCXX) for your project. Unlike some other brands I've seen in use, Barr Quarton includes plenty of high carbon tool steel when he forges his chisels, which clearly fits your buying "once" criteria. BQ may not make the "prettiest" chisels you can buy, but he certainly delivers where it counts. Please keep checking the "Messages" link [above] for more on chisels.
As for a proper mallet, please read through the Framing Chisels thread, on this board, and it should provide some empirical data on the value of balance. Square blows are the key, in short, so good balance is critical in mallet selection.
If you choose to, your project will allow you to learn about proper TF design via the fabrication of English tying joints. Have you considered a King Post design for your trusses, Mattuk?
English Tying Joint: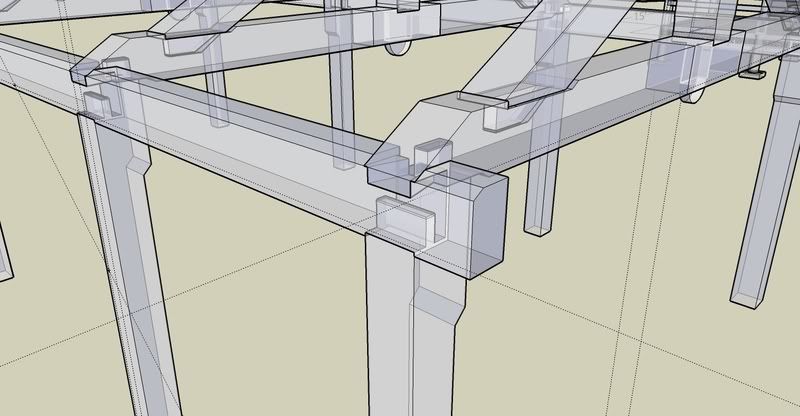 King Post Truss: King Post Truss: |
|
|
|
Post by Red on Nov 2, 2015 1:29:27 GMT -5
That is one impressive tool. What dia. are the cutter shanks? And, is the second/back piece of timber to prevent tearout?
The second timber is a trick I learned on-the-job to further stabilize the router. The mounting chassis is very hefty and, quite honestly, works best with very large timber faces. The faces shown in the photo are relatively small, however, so 12-inches was the preferred dimension in this case. |
|
|
|
Post by Red on Nov 2, 2015 2:17:38 GMT -5
Red, where did you find these tools? Did you import them or have to hunt in Japan ?
Seeing that I was raised on a farm in the deep south, I have a certain affinity for traditional joinery. In fact, I cut my first M&T joint back in 1975, so the techniques -- like those taught by Jack Sobon -- are in my blood. In a modern business environment, on the other hand, one simply can't afford to be overly-stubborn. Although I believe that the computer-controlled joinery fabricated in Tedd Benson's factory could potentially kill the traditional timber framing craft, I also see the benefits of speeding up certain aspects of cutting M&T joinery.
The master I mentioned in the previous post, the one that works almost exclusively with Red Oak, leans more toward the Benson school of thought and it was he who showed me the benefits of Japanese tools, including the Makita TF power tools depicted in this thread...so the answer to your question is that we search for imported tools and, when our luck is good, we make a deal we can justify.
In closing, the other master, who was actually taught by Jack Sobon, always said: It doesn't matter what you take the waste wood out with -- the important thing is to find the layout line by paring with a chisel. Even a Bensonite with a half-million dollar Hundegger should know that. |
|
|
|
Post by Red on Nov 14, 2015 1:14:15 GMT -5
That is one impressive tool. What dia. are the cutter shanks?.... |
|


