

Post by toomanytoys on Oct 30, 2016 20:33:33 GMT -5
I didn't want to contaminate Han's thread for developing his product, but wanted to discuss the parallel guide issue.
Back about 16 years ago on my off time I was building cabinets for my wife's salon business. Not having a table saw or the room for it I bought into a system that was getting traction on Sawmill Creek, the EZSmart system of rails and jigs. Some of the system worked fine, but I had consistency issues with it's parallel guides and Cabinetmaker jigs. So those ended up in a corner and I used the rails in the manner I use the Mafell rails today - measure, mark and set. Of course I'm not doing anything near the amount of work today, especially since Levaquin has screwed up my tendons.
About three years ago I started to do more cabinets and brought out the EZ stuff again as I had more time. I looked at why I was having problems and made some changes. Bought another rail from EZ and found it to be bowed, more frustration. As I found and spent time on it's site I realized there was a dozen years of downward spiral, my bow concern was not being addressed behind the scene, and I went Mafell. Someday a MBA candidate is going to have a good paper on how that company screwed up a good idea from the way I see things.
The EZ Parallel Guides are a patented system, so making something in production can run into issues, but making something for yourself and not for sale is not patent infringement. Making these first generation "Repeaters" into something that can be used on a Mafell rail should not be difficult. I think the problems I encountered could be the reason for the Gen 2 "Repeaters", or cost ... who knows.
So before my awakening of more EZ problems, I did spend time on the site and showed my Repeater modifications. That's where I'll start here, showing those. Both the EZ Rails and the Mafell rails have bottom grooves. And I've counted a number of past EZ owners here at MUF, so if they have the old jigs they could be modified for the Mafell rails as I'm going to do. I just need to grind up a few more elevator bolts and make a new baseplate. The baseplate needs to have ridges that guide with the Mafell rail slots for stability, so there's a lot of aluminum that needs to milled out of a plate. Although for an example and my not wanting a garage of aluminum chips, I could make it out of wood or HDPE.
The reason I think these are a good setup is the trammel bar is spaced away from the rail, so it can stay in place during cutting without the saw blade cutting into it if your measuring and cutting on the right side. And if the posts are in far enough, they should no be cut if you are cutting at an angle.
Basically from my old posting on the other site.
_________________________
Here is where the basic problem was, they just moved around too much! I was able to knock the trammel bar to an angle if not careful and my cut width would change. Not by much but I remember the worst case was maybe 1/8” over 96”. The issue to me was relying on 5/16-18 threaded rod to stand straight. Actually not even 5/16” but the base root diameter of 5/16-18. Just consider the analogue of a skinny tall tree compared to one with a more robust diameter trunk swaying in the wind. Or respective to I-Beams, one with a wider web width having a higher resistance to bending.

First I replaced the baseplate from the plastic one (which was not as stiff as the UHMW material EZ uses today) with ¼” aluminum to act a solid base for the single EZ clamp. The EZ connector extrusions used as the threaded studs base were retained.
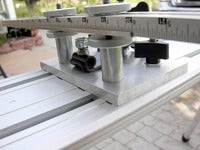
Instead of relying on the threaded studs for stiffness, I moved things around and utilized aluminum spacers 5/16ID x 3/4OD x 1.25L as the pillars, leaving the threaded rods only as a tensioning device. Having a ID close to the 5/16” does help in the stiffness.
This provides a strong base for the trammel rod with the knurled nuts providing full support to the rod. I move the assembly to a point on the track, tighten down the “lower” (in this position) nuts to secure the base, the front knobs and then I’m free to move the trammel to the position I want before tightening the “top” nuts securing the trammel.

On the board side of the unit instead of having two EZ clamps I reverted to one, but used the original position of the clamp adjustment for two locking knobs. The single clamp has held the track to the board well for those times when I’m cutting expensive pre-finished ply, something I do not want to make a mistake with. Honest, these puppies are SOLID!


