|
|
Post by Red on Dec 22, 2015 9:01:25 GMT -5
Okay, so in my zeal to dominate the KSS80Ec operations, I managed to drop [nearly] half a sheet of OSB to the ground -- with the Bosch/Mafell guide rail clamps in place. No, the saw was safely in my talons, so it's still beautiful. The Bosch clamps, on the other hand, didn't fare so well.
Specifically, the short metal plates that slide into the guide rail slots are now "independent" of the clamps. That is, they broke off of the clamps, rendering them useless.
Has anyone else on the board had to effect this repair? If so, please write back with your thoughts.
Have a good one,
Red
|
|
Deleted
Deleted Member
Posts: 0
|
Post by Deleted on Dec 22, 2015 9:10:52 GMT -5
Check page two of this thread link |
|
|
|
Post by Red on Dec 22, 2015 9:30:55 GMT -5
Check page two of this thread link |
|
|
|
Post by holmz on Dec 22, 2015 15:33:03 GMT -5
I thought the OSB forms were firmly held in the vertical?
|
|
|
|
Post by charley1968 on Dec 22, 2015 15:45:50 GMT -5
Appearently not..  |
|
|
|
Post by holmz on Dec 22, 2015 15:50:23 GMT -5
I had sensed a disturbance in the force.  |
|
|
|
Post by Red on Dec 22, 2015 17:35:53 GMT -5
A mighty disturbance in the force there is not, Yogurt. 
OSB panels are still being installed on the interior side of the foundation we've all discussed. The thread you've "sensed" distress in was started in advance -- in case we needed to use the ... wait for it ... Bright side of the Borts. Okay, okay, so I didn't make billions turning stuffed animals into movie stars, but I hope you now realize that a great rift in the force there is not, oh, Jedi Master.
|
|
|
|
Post by holmz on Dec 22, 2015 20:01:26 GMT -5
I find your lack of faith disturbing
|
|
|
|
Post by Red on Jan 1, 2016 18:40:26 GMT -5
PROGRESS REPORT:
So I got some time to bring our damaged pair of Bosch FSN KZW guide rail clamps into the shop for badly-needed repair work. After using our Dremel tool and a very thin metal cutting disc to cut slots into all four "studs" -- aka, broken screws -- I managed to crank two of them out of the clamps (one out of each clamp). The other two remnants broke under the pressure, which sort of leaves me at square one.
I tried grinding one of the work faces flat and drilling into the broken remnant, but, naturally, I went off center and ended up with a hole in the wrong location -- with the tip of a broken drill bit in it, thank you very much. 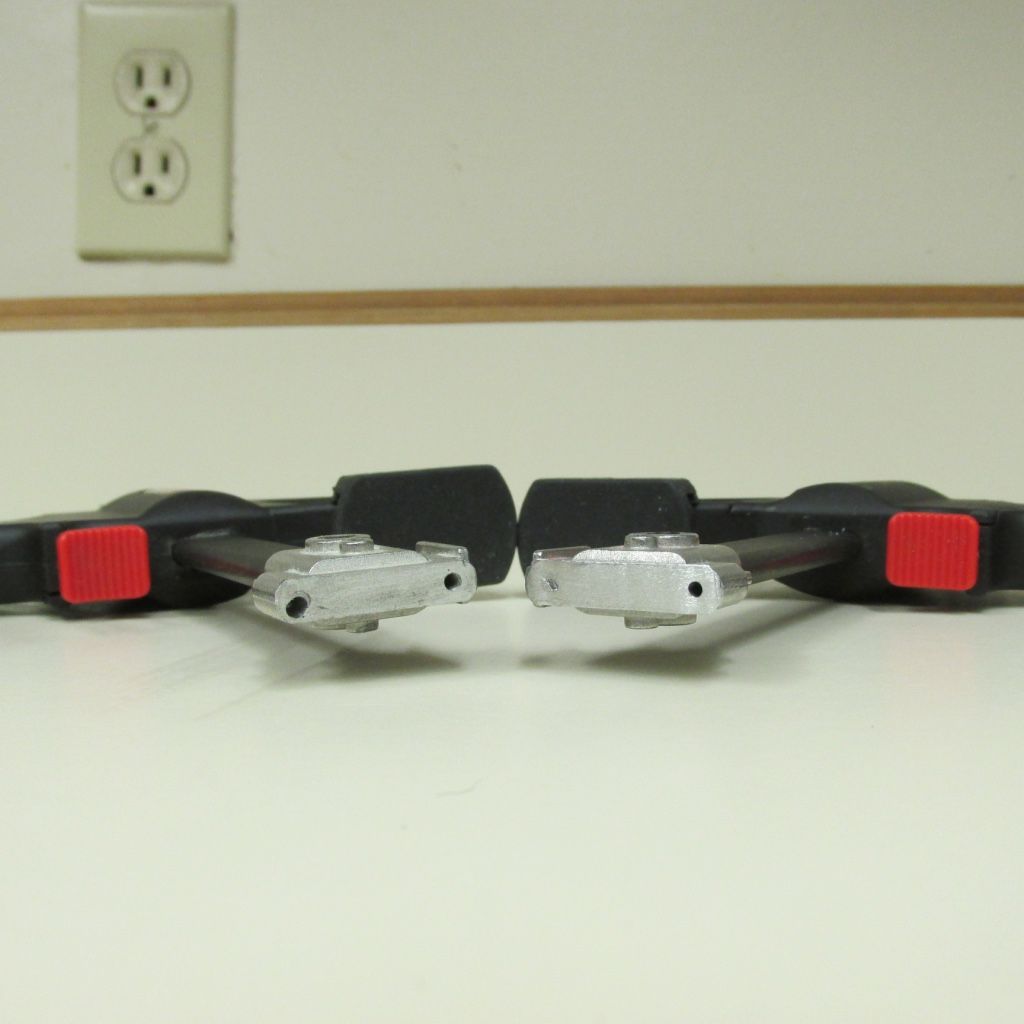
I'm no photographer, but hopefully you can see that the holes on the right side of each clamp work face are ready to accept the hardware we've already ordered and received, but their partners aren't cooperating, obviously.
As a possible solution, I was thinking about grinding both faces flat, cleaning them up and using 3M DP-420 Scotch-Weld to glue the actual "guide rail plates" back onto the faces. As I mentioned in the original post, the metal guide rail plates broke completely away on impact and are, fortunately, in good shape.
I don't have access to the machine shop at the moment, so any thoughts on using 3M DP-420 -- or a better adhesive, perhaps? -- would be most greatly appreciated.
If you're not familiar with 3M DP-420, here's a video showing a pretty convincing test of the product: 3M DP-420 Shear Test - Part 2
|
|
|
|
Post by toomanytoys on Jan 1, 2016 20:33:25 GMT -5
Delayed response waiting for the Dramamine to kick in after watching the video, and somebody needs an Instron..
Otherwise, shear and tension are different stresses and either could be higher values then the other depending on the formulation. I looked at 3M data sheet but from what I saw they only listed shear values.
Worst case with trying and failing is you'll have more drilling and tapping to do. But before filling in those holes with epoxie, does that machine shop have an EDM or know of the capability locally? If you had to pay for it the cost would probably be more then the clamps cost.
|
|
|
|
Post by Red on Jan 2, 2016 0:13:54 GMT -5
Delayed response waiting for the Dramamine to kick in after watching the video, and somebody needs an Instron.. Otherwise, shear and tension are different stresses and either could be higher values then the other depending on the formulation. I looked at 3M data sheet but from what I saw they only listed shear values. Worst case with trying and failing is you'll have more drilling and tapping to do. But before filling in those holes with epoxie, does that machine shop have an EDM or know of the capability locally? If you had to pay for it the cost would probably be more then the clamps cost.
Is it your experience that adhesives exhibiting good shear strength don't hold up under tension? |
|
|
|
Post by toomanytoys on Jan 2, 2016 7:43:50 GMT -5
It truly depends on what the chemist is formulating for. Lap shear is usually spec'd as it actually measures both shear and peel, while tension is adhesion and, well tension. The first few years of my formative adult life was working for a company that was pioneering carbon fiber composites, CF is bound in an epoxy binder, and the CF product is adhered to other substraits with epoxies. Most of the temperature cured epoxies we worked with were better in tension then shear, but there's the "most" word. I looked up the product sheet after you posted hoping to see some tension spec and like most it wasn't noted.
Now that I've written all that I believe it's a good attempt at repair with the screws compromised. Just make sure the surfaces are abraded and well cleaned. You don't need to do an acid etch like we did, but your not trying to keep a helicopter rotor blade together either. That's kind of more important. Epoxy is just not a mechanical grip like a polyurethane is, on metal it is a chemical bond as well, binding with electrons. You can go crazy if you search for cleaning/bonding instructions. The two other issues you are going to have is future galvanic activity between the aluminum and steel (no solution there, just live with it) and any oxide formation on the surfaces between the time you clean the surfaces and actually bond. That just means bond the parts together after you clean them, not waiting a day. Oxides start forming immediately and will take up the potential oxygen bonds where the epoxy would have. And give it the time to fully crosslink as the manufacturer states. Like concrete, it will actually become stronger with more time.
|
|
|
|
Post by Red on Jan 2, 2016 9:46:53 GMT -5
Although the music chosen for the production left much to be desired, Part 1 of the Shear Test I linked you to included Dr. Bass' cleaning method. In short, he used a Dremel Tool with an abrasive attached to clear both contact surfaces of the mild steel bars. Next, he used a clean rag and acetone to wipe down the point of intersection and, after that, he immediately applied the 3M DP-420.
Does that seem like a reasonable way to prepare the both contact surfaces on our clamps for adhesion, Jack?
Would I need to come up with a way to clamp the guide rail plate(s) to the surface(s) shown in the previous photo?
I ask the second question because I own a soft-jawed vise -- which is normally used for electrical applications -- that can hold each clamp perfectly vertical. From there, I could simply place the second piece on top of each clamp and let gravity do its thing?
Put another way, I'm wondering if clamping to decrease the thickness of the adhesion layer is an integral part of the bonding process?
|
|
|
|
Post by toomanytoys on Jan 2, 2016 10:45:35 GMT -5
He did well. After spending 25 years doing R&D product testing I can get just a little critical but after reviewing part 1 (prepping with a new days dose of Dramamine before viewing) he knows what he is doing. I would have washed the surfaces before abrading, then again after. He should have done wider at first to make sure on subsequent washing it wasn't cross contaminated but you're situation has full surface exposure. And to be more critical, triple wash is preferred to make sure you just don't have any reminents of contaminants. Acetone, lacquer thinner, or MEK is fine. The grit of the abrasive depends on the manufacturer specs as does film thickness, but thin is usually better then thick. Aluminum usually requires less surface roughness then steel from what I remember. It was more then a few decades ago. Applying to both surfaces insures full contact without trapped bubbles.
I'm assuming since you have one good threaded hole in each you are still going to use it as a locating and attachment method. That may be enough to clamp the surfaces together, but I would re tighten after a minute due to some squish out. Epoxy is highly viscous so your thought of additional clamping may be correct.
|
|
|
|
Post by Red on Jan 2, 2016 11:47:06 GMT -5
....I'm assuming since you have one good threaded hole in each you are still going to use it as a locating and attachment method. That may be enough to clamp the surfaces together, but I would re tighten after a minute due to some squish out. Epoxy is highly viscous so your thought of additional clamping may be correct. |
|


