|
|
Post by Red on Jul 20, 2015 14:47:57 GMT -5
Well then, despite rather too many gin and tonics last night I've managed to get the glulam tied into the post today. No real joinery on the glulam, but a fair bit of bashing of oak to make a mortice for the end.
I like the photos you just posted. It's hard to tell from the photos, so I'd like to know if you notched the glulam beam or did you cut a pocket into the octagonal post to make that end wall connection?
It's looking good... |
|
ross
Junior Member

Posts: 52 
|
Post by ross on Jul 20, 2015 16:32:46 GMT -5
Hiya Red
I did both, there's a four inch deep "mortice" into the oak post, open at the top and the glulam is notched to carry onto the other oak beam along the top surface. This gives support to the glulam throughout it's depth. Everything I've seen seems to suggest glulam will split if notched and supported only on the notch. The glulam was typical white-wood to work, I.e. not easy to chisel across the grain without splitting deep and a bit knotty. I've pegged through the oak and glulam to hold in place.
|
|
ross
Junior Member
Posts: 52
|
Post by ross on Jul 21, 2015 13:00:55 GMT -5
A bit more progress today, avoiding gin seems to help! First of all, cut the tie beam to length, plane it down (wish I had a beam planer), level the underside at both ends;  Next, find the middle and level the top to the two undersides for the mortice face for the king post;  After this, plane the king post and mark out the tenon, crumbs, the post looks a wee bit short and that tenon looks fairly long!;  Cross cut the waste and bash with the "Birmingham Screwdriver";  Next, start chiselling flat, give up and take a good lie down! |
|
|
|
Post by Red on Jul 21, 2015 13:13:36 GMT -5
I lived in Oxfordshire, Ross, so the only thing Birmingham I really know is Black Sabbath.
What are you "bashing" the cross-cut waste with?
How do you like using your Record plane for finishing beams?
|
|
ross
Junior Member
Posts: 52
|
Post by ross on Jul 21, 2015 16:06:59 GMT -5
Hiya Red A "Birmingham Screwdriver" is known elsewhere as a hammer  . I've been using a 28oz Estwing, which is what I'm using on the chisel as I can't find my mallet (not necessarily textbook practice I know!). I've had the Record 5 1/2 for nearly 30 years and feel very comfortable with it. It's great going across the grain, but a bit tricky with the grain in oak. It's fine on softwoods. I'm not sure if it needs a bit of fettling, a decent iron or just a better operator. I find that unless the iron is set just so, it does tend to grab at the start of a cut in oak and won't get as fine a shaving as it does in say pine. Overall I find it the perfect size hand plane as the mass gives it good inertia, but I am 6'1" and 200 pounds. I think it was probably the last of the easily usable Records as reportedly they went downhill somewhere in the 80s onwards. It was nicely ground flat and square. |
|
ross
Junior Member
Posts: 52
|
Post by ross on Jul 22, 2015 14:13:51 GMT -5
I spent a lot of time cleaning up the tenon, it may have been a mistake "bread slicing" this one, instead of just ripping down the cheeks. There were a number of knots and wild grain which made it a bit of a pig, but done now. Next was the through mortice which was fairly easy to do although the auger bit did run off a bit once, luckily into the mortice and not anywhere else. So trial fit, going;  skim..skim..skim, going;  skim..skim..skim..gone  just need to scribe round the shoulders to fit.  Due to having a good old bit of tenon showing I was thinking of some decorative motif or something, not just a square end, or lollipop stick. I played around trying to get a diamond/lozenge effect with a few saw cuts on an off-cut, what do you think (admittedly it's a rubbish picture and it was pine with a rough saw) The left hand side is the idea all around, proportions would be different, I can't find anything on google picture search;  |
|
|
|
Post by Red on Jul 22, 2015 14:47:33 GMT -5
I've seen traditional timber framers round the edges off and call them "pendants." I've also seen geometric shapes where the framer simply cut the bottom corners off at equal angles to form a five-sided pendant. I have to admit that I like both effects. If you're a creative lad, Ross, you could always use your imagination and go with a some sort of a sword handle effect.
Regardless, your tie beam/lower chord and king post work is looking good. Keep up the great work.
|
|
|
|
Post by Red on Jul 22, 2015 15:03:37 GMT -5
By the way, Ross, here's a pendant that was cut into a hammer beam truss. I know that you're constructing a king post truss, but this will give you some idea of what some timber framer's do with their "exposed" joinery, nevertheless. Notice the pointed end on the short horizontal chord. Very easy, simple and to the "point."  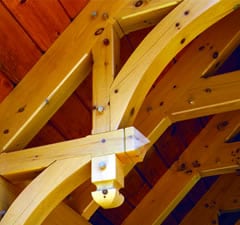
|
|
ross
Junior Member
Posts: 52
|
Post by ross on Jul 22, 2015 16:07:05 GMT -5
By the way, Ross, here's a pendant that was cut into a hammer beam truss. I know that you're constructing a king post truss, but this will give you some idea of what some timber framer's do with their "exposed" joinery, nevertheless. Notice the pointed end on the short horizontal chord. Very easy, simple and to the "point." Thanks Red, I'm going to think a bit, I'm just surprised there is little or anything I can find on the narrow through tenons, apart from hundreds of simple lollipops or just slightly trimmed. There are quite a few added on "post heads?" a bit like the lower pendant on the hammer beam shown, but I like a slightly plainer "more honest" approach without it being overly decorative. (plus did I mention quick and simple:-) |
|
|
|
Post by Red on Jul 22, 2015 16:21:19 GMT -5
Cutting the bottom corners off at equal angles is about as simple and fast as it gets, Ross. It also looks pretty good as a pendant effect.
|
|
ross
Junior Member
Posts: 52
|
Post by ross on Aug 1, 2015 7:14:28 GMT -5
The end is nearly in sight!! Marked out the end of the tie beam for bridle joints, scratched head a lot, applied as many saws as possible and found a Japanese rip saw was the best. I actually think if I had a western rip saw this would have been better;  Checked to see if the waste would come out quickly with a chisel;  Decided a bit of drillification would help;  ...and finally done, do x 2;  ..and here we have 5' of 6"x2" held up by friction, may need to ease the joint a touch;  I will return in a bit to show you finished job. |
|
Deleted
Deleted Member
Posts: 0
|
Post by Deleted on Aug 1, 2015 8:39:54 GMT -5
Good stuff Ross , thanks for sharing .
|
|
ross
Junior Member
Posts: 52
|
Post by ross on Aug 1, 2015 9:25:46 GMT -5
Nextly I did some jiggery pokery at the top of the post;  ....and then came up with a solution to what to do about the through-tenon, a bit Scottish baronial, but it was very simple to do;  ...and finally with some huffing and puffing and bashing with a mallet, club hammer or two, it's in place;  ....with a quickly turned out wedge;  |
|
|
|
Post by Red on Aug 1, 2015 12:28:48 GMT -5
Do you still have more KP trusses to build? If so, I'd really like to see the rafter to tie beam connection.
Really like the ridge joinery and the Scottish pendant, Ross.
|
|
ross
Junior Member
Posts: 52
|
Post by ross on Aug 5, 2015 13:01:07 GMT -5
Do you still have more KP trusses to build? If so, I'd really like to see the rafter to tie beam connection.
Really like the ridge joinery and the Scottish pendant, Ross.
Hi Red, not sure if you would like to see the connection. After various discussions (and despite my claims to honesty in joinery!), the connection is just a coach bolted one into plain planed softwood rafters  |
|


 . I've been using a 28oz Estwing, which is what I'm using on the chisel as I can't find my mallet (not necessarily textbook practice I know!).


